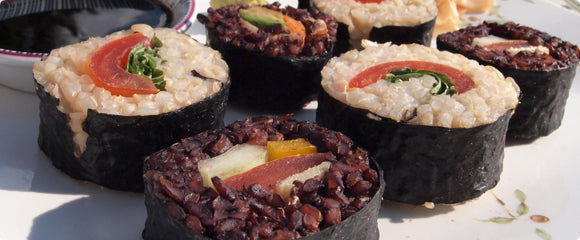
Sushi
From our
Holiday Feast eBook
Ingredients
- Nori sheets (dried seaweed sold in packages – Eden brand recommended)
- Rice recipe (see below)
- Vegetables of choice (see below)
- Wasabi (Japanese horseradish – sold in green powder or premixed)
- Nama Shoyu (unpasteurized soy sauce)
- Sushi rolling mat
- Spatula for spreading rice
Rice Recipe
- 2 cups brown rice, wild rice, or quinoa
- 4 cups water
- 1/8 to ¼ cup honey
- 2 Tbsp rice vinegar
Combine water and honey.
Cook rice/quinoa per package suggestion.
Once rice/quinoa is fully cooked, place in a bowl, drizzle rice vinegar, and fluff.
Filler Vegetables
You can use anything you wish, but here are some that work well:
- Avocado
- Basil
- Bamboo shoots, canned
- Bean sprouts, fresh or canned
- Bell Pepper (any color)
- Carrot, sliced or shredded
- Clover sprouts
- Cucumber, seeds removed. If skin is thick, peel first.
- Hot Pepper
- Pickled ginger
- Tomato
- Red onion
- Yellow tomato, seeds removed
Cut some veggies thicker and some thinner (variety in size adds interest and brightly colored vegetables add eye appeal).
Set vegetables in front of your sushi prep area, each ingredient in a separate pile.
Sushi Assembly
Cut strips of the vegetables you have chosen to use and gather them in front of you. Place prepared rice beside you.
Lay your mat on a countertop so that the bamboo rods run left to right in front of you. Place a piece of nori on the mat.
Wet your spatula. Scoop out rice and spread it ¼-inch thick over nori sheet, leaving a 1-inch strip across the edge furthest from you with no rice. Use fingers if you like. (NOTE: You do not have to spread the rice to the edges. When you roll the nori, the pressure of your squeezing will cause the rice to actually push to the edges and beyond.)
Once rice is spread, place vegetables in a 3-inch wide strip across the entire piece of nori from left to right.
Lift the end of the sushi mat that is closest to you, and begin to roll the sushi forward, using the mat to assist you (so that your fingers don’t poke through the nori sheet). Ensure that you make a tight roll, peeling back the rolling mat as needed so that it doesn’t get rolled into the food.
As you approach the end of the roll, wet the bare nori strip (on the edge furthest from you) with water and use that strip as a seal like an envelope. Make sure you have a tight roll. If the sushi is not rolled tightly, it will fall apart.
Place the seam side down before cutting. Use a VERY sharp knife to cut smooth thin pieces approximately ½’ to 1” thick.
Arrange the slices on your platter along with a small bowl of wasabi paste and a small bowl of Nama Shoyu.
For each piece of nori, you can make 8 individual neat pieces and 2 end pieces. Sometimes the end pieces look decorative and pretty. Other times they look messy.
Once you get the hang of rolling sushi, it is very easy to make it look neat and pretty.
To wash your rolling mat, scrub with a brush and a touch of detergent. Let it air dry.
More Summer Picnic Recipes: